Posts

Showing posts from April, 2018

Guest Designing for Studia Katia

Image
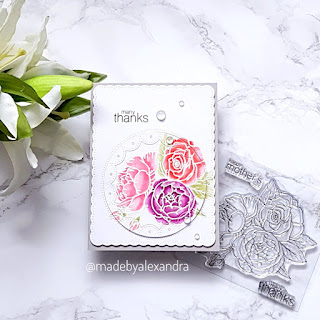
Hello everyone! Today I am having the honour to guest design for Studio Katia today and wanted to share with you 3 projects that I have created First is this floral card and I have to say that I just love  how the  Spring Bouquet stamp set  come with the flowers already arranged in a bouquet and you don't need to mask or try to figure out yourself how to arrange the flowers in a bouquet ( which for me is the most struggling part when I create a floral card :) To start the card I die cut a piece a water color cardstock using  Dotted Patterns : Scallop Frames creative dies and the stamped and embossed using white embossing powder and Versamark ink. For the coloring I used distress inks which I just smooshed onto a piece of acetate and just picked the color with a water brush. After the coloring was completely dries I went ahead and die cut a circle using  Dotted Patterns : Fancy circle Creative dies  kept all the tiny pieces and adhered the circle back in place using f

Create a smile challenge -Favourite stamp set

Image
Hello everyone! Today starts a new challenge on Create a smile blog and the theme is Favourite Create a smile stamp set . And here is one of mine : All hands on deck , this is I think my most used and loved stamp set <3 my kids really love this adorable pirates so every time I got a chance I use this set . Fo my card today I started by stamping and colouring the images using Spectrum Noir alcohol markers Then I took the largest rectangle die from Cool cuts Double stitched rectangles and die cut my panel , and the took the Cool cuts Postage edge circles and partial die cut the second largest circle. After inking the background using Distress ink I stamped the Sophisticate shells cling stamp using Versa Mark and then adding clear embossing powder . Last I adhered my critters using foam tape and stamped the sentiment from the same stamp set. Thank you for stopping by , have a great day.

Mama Elephant Picnic with friends stamp set

Image
Hello everyone! I recently bought this adorable stamp set from Mama Elephant called Picnic with friends and here are two cards that I made using it For this first card I also have a video where I share step by step how I created the card ,and for the second card I just wanted to try my hands on creating my own scene using alcohol markers . For the first card the supplies that I used are Distress inks , Studio Katia - Scallop Frames die cut Lawn Fawn - Grassy border and Forest Border Craftin Desert Divas - Scenery dies Thank you so much for stopping by today . Have a great day

Creating an easy alcohol ink background using markers

Image
Hi everyone! Today I am going to share with you an easy way to create an alcohol ink background using alcohol markers. I started by taking a piece of photo paper and some alcohol markers and just scribbled the markers on to the paper ( I used the non slick surface from the paper) Then I took an alcohol ink blending solution and added a few drops to the paper and with a straw I moved around the color. You can also check the video that I have created where you can see step by step the process of how my background turned out. To finish my card I was inspired by the current sketch challenge from MFT, and coloured the images from Snuggle Bunnies stamp set and adhered them using foam tape. Also the sentiments is from the same set , I stamp it on black cardstock using Versa Mark and embossed it using white embossing powder. Finished the card using some Pretty Pink Posh sequins. Thank you for stopping by! Have a great day. Challenge  MFT Card challenges -

How to create a custom background using stencils

Image
Hello everyone! I'm stopping by today to share with you an easy way to create your background using distress inks and stencils For my card today I am using the new stencil from Create a Smile called Petals and distress inks I started by die cutting the panel using  Double Stitched rectangles dies from Create a Smile and the slowly adding color using my distress inks. Stamped the leaves from Clustered leaves stamp from Create a smile and adhered them using foam tape. The sentiment is also from Create a Smile and is a die cut word called Thanks twice I have also made a video where is hare the step by step process for this card if you want to check it  Thank you for stopping by ! Have a lovely day ♥ ♥Just a quick disclaimer ♥♥ Being in on different design teams some products are sent to me , but the opinions are mine and I share only products that I love.

Birthday Wishes

Image
Hello everyone! Stopping by today to share with you a card that I made for the current challenge from Simon Says Stamp  Simon Says : Happy Birthday I started by stamping the beautiful floral image from Bouquet of thanks stamp set from Simon Says Stamp using a light ink onto craft cardstock  Next I started coloring the flowers using Polychromos pencils and building gradually the color. Once the images were colored I stamped the sentiment using Versa Mark ink and white embossing powder . The sentiment is from Studio Katia - Blooming bunch stamp set . To finish the card I added some clear drops also from Studio Katia and adhered them down using Glossy Accents . Thank you for stopping by ! Have a great day! Challenge  Simon Says : Happy Birthday

Create a smile stamps April release review

Image
Hello everyone! Today I am sharing a peek to the new release from Create a Smile stamps The first card and stamp set I am sharing is called Believe in you , and for this card I created an alcohol ink background and then stamped the sentiment using Versa Mark ink and gold embossing powder Next stamp set from this release is called Bujo Basics and this set can be used for cards but also for bullet journaling . One of my favourite stamps in this release is called Fun Flowers  Another set that I really like is called Lettering Alphas and its so easy to create your own words using this set  With this release Create a smile brought us two stencils  Blossom  and Petals Also made a video in which I am showing you the stamp sets and stencils if you want to check , and I will update the blog post with links to the products once they will be available on Create a smile store! Thank you for stopping by! Have a great day ♥ ♥Just